Lesson Notes By Weeks and Term - Primary 3
Length
Length
TERM: 3rd Term
WEEK: 7
CLASS: Primary 3
AGE: 8 years
DURATION: 5 periods of 40 minutes each
DATE:
SUBJECT: Mathematics
TOPIC: Length
SPECIFIC OBJECTIVES: At the end of the lesson, the pupils should be able to
INSTRUCTIONAL TECHNIQUES: Explanation, question and answer, demonstration, practical, assessments
INSTRUCTIONAL MATERIALS: Rulers, labelled pieces of string cut to various lengths, work card, scrap paper/white boards, Cut-outs of rectangles, squares and circles (one set per group), string, circle/plate, Square and rectangular shaped objects from the classroom preferably with exact dimensions in cm, whiteboards/scrap paper, square cut-outs, rectangular shapes, videos from source-
PERIOD 1: Length
PRESENTATION | TEACHER’S ACTIVITY | PUPIL’S ACTIVITY | ||||||||||||||||||||||||
STEP 1 MENTAL MATHS | The teacher begins the lesson with some mental calculations Calculate 1. 114 – 9 = 2. 119 – 9 = 3. 113 – 9 = 4. 118 – 9 = 5. 112 – 9 = 6. 120 – 9 = 7. 116 – 9 = 8. 111 – 9 = 9. 115 – 9 = 10. 117 – 9 = | Pupils respond and participate | ||||||||||||||||||||||||
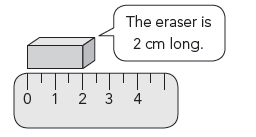
STEP 2 CONCEPT DEVELOPMENT | The teacher • Asks learners to: −− show you an estimate of one centimetre with their fingers. −− show you where 1 cm is on their rulers. • Reminds the learners that when measuring in centimetres, we do not line up the object being measured with the start of the ruler; we line it up with the zero on the ruler.
• Asks them to show her 1 cm on other parts of their ruler, e.g. between 2 cm and 3 cm.
• Reminds them that cm is short for centimetre.
CLASS ACTIVITY The teacher Gives each group of learners at least three cardboard strips of different lengths. Learners must measure the lengths of each of the strips of paper. • Offers assistance as required, checking that children are placing the zero on the ruler against the beginning of the line and reading the measurement correctly. Learners could draw the length of the strips they measure and write the measured length next to each one.
ACTIVITY II The teacher *Gives the learners various objects in the class to measure with their rulers, e.g. length, height and width of their schoolbag, length of a pencil, etc.
*Reminds them continuously about where to start measuring on the ruler (line up zero to the starting point of the measurement). | Pupils pay attention and participate | ||||||||||||||||||||||||
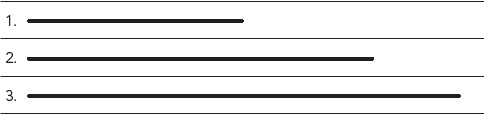
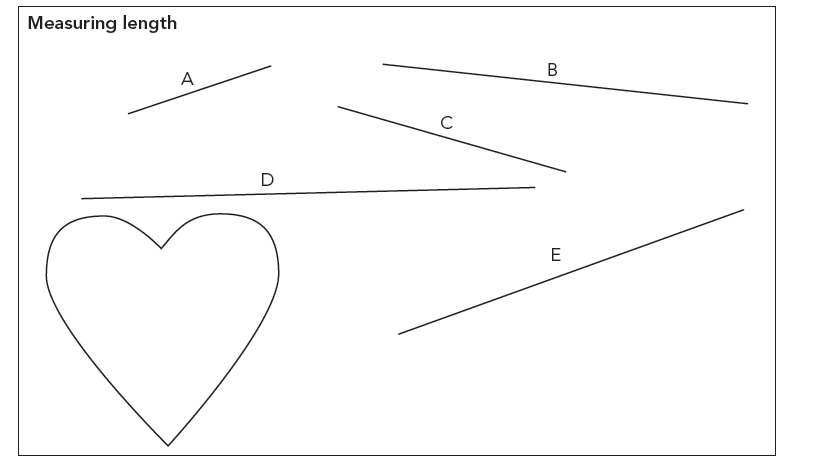
STEP 3 CLASS-WORK | First estimate, then measure the length of these lines. Copy and complete this table in your Maths book.
| Pupils attempt their class work | ||||||||||||||||||||||||
STEP 4 HOME-WORK | Ask everybody in your family to line up. 1. ________________________ is the tallest. 2. ________________________ is the shortest. 3. Use a tape measure/ruler to find out: a) I am __________ cm tall. b) Dad/Mum/Granny is __________ cm tall. c) The kitchen chair is __________ cm high. |
| ||||||||||||||||||||||||
STEP 5 SUMMARY | The teacher summarizes by reminding the pupils how to Estimate, measure and record lengths in centimetres using a ruler. She marks their class works, makes corrections where necessary and commends them positively |
|
PERIOD 2: length
PRESENTATION | TEACHER’S ACTIVITY | PUPIL’S ACTIVITY |
STEP 1 MENTAL MATHS | The teacher begins the lesson with some mental calculations Calculate 1. __ – 10 = 18 2. __ – 9 = 18 3. __ – 10 = 13 4. __ – 9 = 13 5. __ – 10 = 15 6. __ – 9 = 15 7. __ – 10 = 17 8. __ – 9 = 17 9. __ – 10 = 14 10. __ – 9 = 14 | Pupils respond and participate |
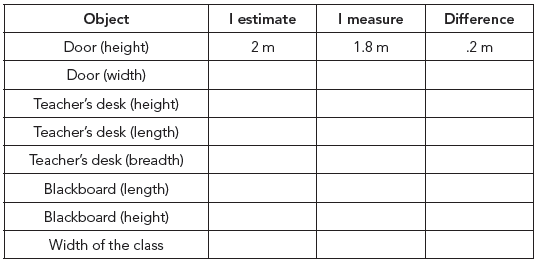
STEP 2 CONCEPT DEVELOPMENT | The teacher Draws an estimation recording sheet (like the one shown below) on the chalkboard before the lesson. Demonstrates the steps to take to complete the table using the door as an example. Measurements must all be done in metres.
• Step 1: Ask learners to estimate the height of the door. Select one response and record this in the I Estimate column on the board. • Step 2: Ask a learner to measure the height of the door. Record this in the I Measure column on the board. • Step 3: Calculate the difference between the estimations and measurements and record this in the Difference column. Learners complete the table following the steps for each of the objects in the table.
CLASS ACTIVITY The teacher • Asks learners to each draw their own recording sheets on their scrap paper/whiteboards for the next activity. • Gives each group of learners 4 pieces string (each of a different length). • Asks learners to go through the same steps (1–3) as above to find measurements of their pieces of string.
After they have completed the three steps for one piece of string, they pass the piece of string to the person on the right and go through the three steps all over again for the next piece of string.
Learners should all measure each of the 4 pieces of string. Once everybody has measured all four pieces of string, the group needs to discuss the following: −− ____ was the longest. −− ____ was the shortest. −− ____ and ____ are the same length. −− A and C measure ____ cm altogether. | Pupils pay attention and participate |
STEP 3 CLASS-WORK |
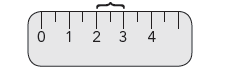
1. A is _____ cm. 2. B is _____ cm. 3. C is _____ cm. 4. D is _____ cm. 5. E is _____ cm. 6. Line ___ is the longest. 7. Line ___ is the shortest. 8. ___ and ___ have the same length. 9. A is ____ shorter than D. 10. B is ____ longer than A. 11. The difference between A and ___ is 2 cm. 12. Use a piece of string to measure the length of the sides of the heart. Use your ruler to work out the measurement in cm. | Pupils attempt their class work |
STEP 4 HOME-WORK | 1. Calculate a) 64 cm – 23 cm = ___ b) 43 cm x 2 =
2. Fill in more than, less than or equal to: a) 48 cm + 32 cm ___ ( ) 100 cm – 15 cm b) 100 cm ÷ 5 ___ ( ) 4 x 5 cm |
|
STEP 5 SUMMARY | The teacher summarizes by reminding the pupils how to Estimate, measure, compare, order and record length using metres (either metre sticks or metre lengths of string) as the standard unit of length.
She marks their class works, makes corrections where necessary and commends them positively |
|
PERIOD 3: Length-Perimeter
PRESENTATION | TEACHER’S ACTIVITY | PUPIL’S ACTIVITY |
STEP 1 MENTAL MATHS | The teacher begins the lesson with some mental calculations Calculate 1. 376 + 20 = 2. 376 – 20 = 3. 765 + 20 = 4. 765 – 20 = 5. 268 + 20 = 6. 268 – 20 = 7. 578 + 20 = 8. 578 – 20 = 9. 749 + 20 = 10. 749 – 20 = | Pupils respond and participate |
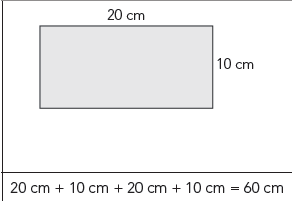
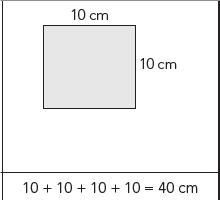
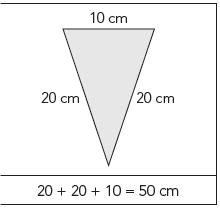
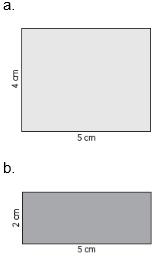
STEP 2 CONCEPT DEVELOPMENT | The teacher Explains that the term perimeter means the measurement of the distance around a shape. • Asks the learners how they would go about working out the distance around a rectangle. • Explains to the learners that we would add the measurements of all of the sides of the rectangle to work out the perimeter of the rectangle. • Draws a rectangle on the board, measure each side and label the lengths of the sides. Show the calculation for finding the perimeter. Do the same for a square and a triangle. (Illustrated below.)
• Cuts out rectangles, triangles and squares and give one of each to each group. Make sure the sides of the shapes measure full centimetres (so that learners can find the lengths in cm). • Lets the learners work in their groups to calculate the perimeter of each shape.
Learners should measure the lengths of each side of every shape and calculate the perimeters.
CLASS ACTIVITY The teacher • Discusses comparisons between pairs of containers (based on pictures that you have brought to class). For example: − The capacity of the Sunlight Liquid container is ______. (5 litres) − The capacity of the milk container is _____. (1 litre) − The capacity of the Vanish container is ______. (1 litre) − The capacity of the Dettol container is ______. (2 litres) − The capacity of the green milkshake bottles is _____. (500 ml) − The capacity of the Fanta container is _____. (340 ml) − The capacity of the ___ (Sunlight Liquid) container is largest. It contains ___ (3 litres) more than the Dettol.
ACTIVITY II The teacher • As a class discusses how we can measure the perimeter (distance around an object) of a circle. This is also called the circumference of a circle. We can use a piece of string.
• Uses a circle/plate/cylinder to demonstrate to the learners how one of them can hold the string and the other one places the string around the side of the circle/plate until it meets at the starting point. To measure the perimeter we need to straighten out the string and measure the length of the string using a ruler. | Pupils pay attention and participate |
STEP 3 CLASS-WORK | 1. Trace a matchbox in your book. Measure the sides and label them. Add all the sides and write down the perimeter of the rectangle.
2. Cut out three strips of paper. All need to be the same length. Stick them in your books to make a triangle. Measure the sides and label them. Add all the sides and write down the perimeter of the triangle.
3. Draw a rectangle in your book. Follow the steps in Question 1.
4. The perimeter of a rectangle is 12 cm. The short sides measure 2 cm.
Draw the rectangle and write down the measurements of all of the sides. | Pupils attempt their class work |
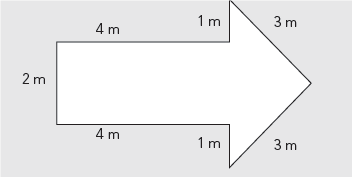
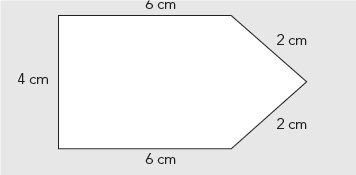
STEP 4 HOME-WORK | Calculate the Perimeter of these shapes
|
|
STEP 5 SUMMARY | The teacher summarizes by reminding the pupils how to Estimate, measure, compare, order and record length using metres (either metre sticks or metre lengths of string) as the standard unit of length.
She marks their class works, makes corrections where necessary and commends them positively |
|
PERIOD 4: Area
PRESENTATION | TEACHER’S ACTIVITY | PUPIL’S ACTIVITY |
STEP 1 MENTAL MATHS | The teacher begins the lesson with some mental calculations Calculate 1. 18 – 8 – 5 = 2. 17 – 7 – 5 = 3. 16 – 6 – 5 = 4. 15 – 5 – 5 = 5. 14 – 4 – 5 = 6. 13 – 3 – 5 = 7. 12 – 2 – 5 = 8. 11 – 1 – 5 = 9. 10 – 1 – 5 = 10. 9 – 1 – 5 = | Pupils respond and participate |
STEP 2 CONCEPT DEVELOPMENT | The teacher • Asks learners to place the pile of squares that they have cut out in front of them. • Asks learners where they have seen tiles before (bathroom/kitchen walls, floors, etc.). • Tell them that before someone tiles a wall or floor they need to estimate the number of tiles they will need so that they buy enough. Learners will now pretend that the squares they have cut are tiles for a floor. They can pretend that the cover of their DBE Workbook is a floor that they must tile. • Ask each learner to estimate how many squares would cover the floor (i.e. DBE Workbook cover). Each learner writes down their estimate. • Asks pairs of learners to pack out the squares on the DBE Workbook cover. Ensure that there are no gaps or overlaps. • Discusses the differences between the estimates and the measurements. Ask: Whose estimation was closer? (Discuss. Estimates that are close are fine. Estimates that are way out are not good enough – learners must take care to make good estimates.) • Explains that when we measure the surface of a space we call this the area. Write the word on the board and get the children to say it after you. • Asks a few learners to explain to you what area means. Encourage them to speak about concrete examples as they give their explanations. (Area = The amount of a flat surface that is covered.)
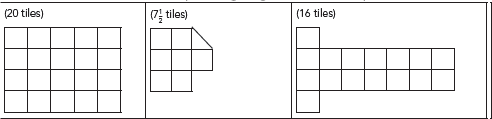
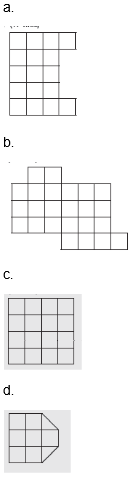
CLASS ACTIVITY The teacher * Before the lesson draw grids on the board with all the blocks the same size. • Asks learners to help you to count the number of squares/tiles in each drawing. What is the area of each of these shapes, using the given tiles in the shapes? | Pupils pay attention and participate |
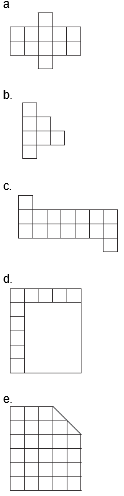
STEP 3 CLASS-WORK | 1. What is the area of these shapes:
2. Use squares and half squares to draw three figures on the grid paper below. Each figure should have an area of 12 squares. | Pupils attempt their class work |
STEP 4 HOME-WORK | Draw three shapes each with an area of 10 blocks on a sheet of grid paper. |
|
STEP 5 SUMMARY | The teacher summarizes by reminding the pupils how to Investigate the area using tiling.
She marks their class works, makes corrections where necessary and commends them positively |
|
PERIOD 5: Weekly Test/consolidations
TEACHER’S ACTIVITY: The teacher revises all the concepts treated from period 1-4 and gives the pupils follow through exercises, quiz and tests. She marks the exercises, makes corrections and commends the pupils positively.
PUPIL’S ACTIVITY: The pupils work on the worksheets and exercises given by the teacher individually
CONSOLIDATION
© Lesson Notes All Rights Reserved 2023