Lesson Notes By Weeks and Term - Primary 3
Symmetry
Symmetry
TERM: 2nd Term
WEEK: 7
CLASS: Primary 3
AGE: 8 years
DURATION: 5 periods of 40 minutes each
DATE:
SUBJECT: Mathematics
TOPIC: Symmetry
SPECIFIC OBJECTIVES: At the end of the lesson, the pupils should be able to
INSTRUCTIONAL TECHNIQUES: Explanation, question and answer, demonstration, practical, assessments
INSTRUCTIONAL MATERIALS: Scrap paper cut into squares and rectangles, One large cut-out paper circle, square, rectangle and triangle (for demonstration), Shape cut outs, videos from source-
PERIOD 1: Symmetry Part 1
PRESENTATION | TEACHER’S ACTIVITY | PUPIL’S ACTIVITY |
STEP 1 MENTAL MATHS | The teacher begins the lesson with some mental calculations Calculate 1 __ × 10 = 60 2 __ × 10 = 40 3 __ × 2 = 10 4 __ × 2 = 44 5 __ × 100 = 600 6 __ × 10 = 70 7 __ × 2 = 18 8 __ × 2 = 20 9 __ × 10 = 100 10 __ × 100 = 0 | Pupils respond and participate |
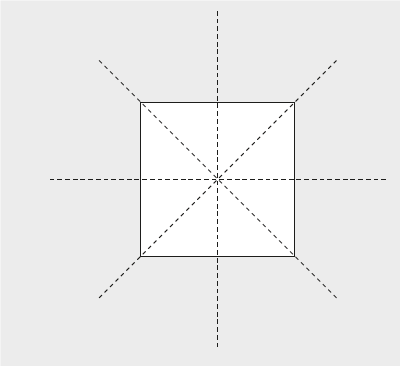
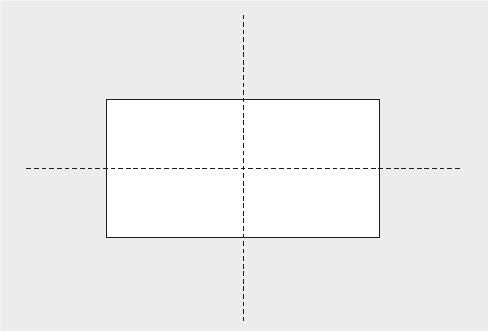
STEP 2 CONCEPT DEVELOPMENT | The teacher • Gives each group of learners a paper square cut out of scrap paper. • Asks the learners to fold the paper square to show the line of symmetry, using a vertical line. • Unfolds and traces over the fold with a red pencil. • Uses the same square, but use a horizontal line to show the line of symmetry. Trace the fold with a blue pencil. • Asks the learners is there another line of symmetry that you can fold? (Yes, diagonal.) • Draws the line using a green pencil. • Asks the learners is there another line of symmetry that you can fold? (Yes, another diagonal.) • Draws the line using a purple pencil. • Asks the learners is there another line of symmetry that you can fold? (No.) • How many lines of symmetry altogether? (Four.) CLASS ACTIVITY • Repeat the steps above with a rectangle cut out of scrap paper. (You will find two lines of symmetry.) • Encourage the learners to investigate if the diagonals of the rectangle are lines of symmetry – this will show them concretely that the rectangle only has two lines of symmetry.
| Pupils pay attention and participate |
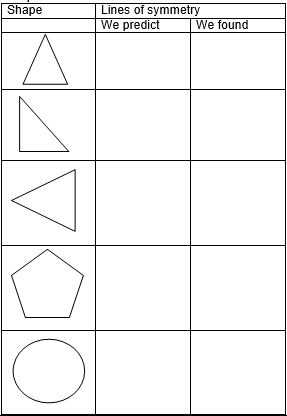
STEP 3 CLASS-WORK | The teacher explains to the learners that predicting the lines of symmetry is important. They should try to predict before they use paper folding to find the lines of symmetry. Explain the activity to the class before they begin.
For each shape in the table learners must: 1 Predict the number and draw the lines of symmetry. Write these answers in the ‘We predict’ column. 2 Cut out the shape and fold it to find all the lines of symmetry. Draw and write your answers in the ‘We found’ column. 3 When you have completed the worksheet discuss with another pair what you predicted and what you found. Complete the table:
| Pupils attempt their class work |
STEP 4 HOME-WORK | 1 Draw a square. 2 Draw a design inside the square so that the square is still symmetrical.
| Pupils attempt their class work |
STEP 5 SUMMARY | The teacher summarizes by reminding the pupils how to find and draw in lines of symmetry in 2-D shapes.
She marks their class works, makes corrections where necessary and commends them positively |
|
PERIOD 2 : Symmetry
PRESENTATION | TEACHER’S ACTIVITY | PUPIL’S ACTIVITY | ||||||||||||||||||||||||||||||||||||
STEP 1 MENTAL MATHS | The teacher begins the lesson with some mental calculations Calculate 1 __ × 5 = 55 2 __ × 10 = 40 3 6 × 2 = __ 4 __ × 4 = 40 5 __ × 10 = 60 6 8 × 4 = __ 7 __ × 5 = 45 8 __ × 4 = 24 9 6 × 5 = __ 10 6 × 6 = __ | Pupils respond and participate | ||||||||||||||||||||||||||||||||||||
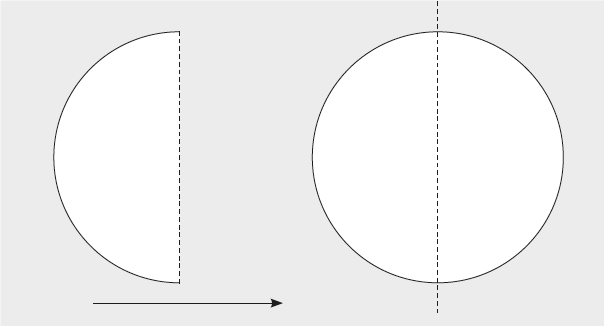
STEP 2 CONCEPT DEVELOPMENT | The teacher (You need a large cut-out circle for this activity – for demonstration purposes) • Shows learners a large circle and explain that you are going to fold it to find the line of symmetry. • Folds the circle perfectly in half, so that the fold will be in the place of a line of symmetry for the circle. • Asks: What will the shape look like when you open it up? • Asks: How would you do a drawing of the shape with its line of symmetry? • Unfolds the circle and examine the fold line that represents a line of symmetry. Once you have worked with the concrete shape, do the drawings. On the drawings mark the lines of symmetry.
• On the board draw a picture of the folded shape and the unfolded shape with the line of symmetry in its place. • Asks: Could I fold the shape in another place to find a different line of symmetry? (Yes, I could fold it many ways and find a line of symmetry. Demonstrate.)
CLASS ACTIVITY The teacher • Repeats the sequence of steps above using other shapes – to demonstrate finding lines of symmetry. Allow learners to come to the front and participate in the demonstration is possible. • Asks the learners to predict what it will look like when you open the shape up, i.e. What do you think this shape will look like if you drew it with its line of symmetry? • Each time, shows the original shape first, then show it folded, then unfold it and examine the fold line that represents a line of symmetry.
Once you have worked with the concrete shape, do the drawings. On the drawings mark the lines of symmetry. • Does all of these steps with the shapes below. Interact with the learners while you do this, allowing them to predict the fold lines/lines of symmetry. Allow some learners to come and do the drawings on the board if time allows. • Square (4 lines of symmetry) • Rectangle (2 lines of symmetry) • Triangle (Various lines of symmetry, depending on the triangle) • Circle (MANY lines of symmetry – an infinite number) | Pupils pay attention and participate | ||||||||||||||||||||||||||||||||||||
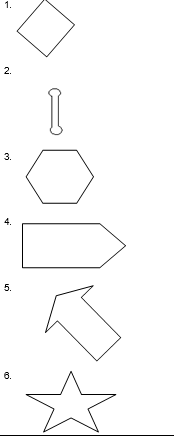
STEP 3 CLASS-WORK | Draw the lines of symmetry into the following shapes: | Pupils attempt their class work | ||||||||||||||||||||||||||||||||||||
STEP 4 HOME-WORK | 1 Draw a symmetrical pattern in this grid.
2 How many lines of symmetry in your pattern? | Pupils attempt their class work | ||||||||||||||||||||||||||||||||||||
STEP 5 SUMMARY | The teacher summarizes by reminding the pupils how to find lines of symmetry in 2-D shapes.
She marks their class works, makes corrections where necessary and commends them positively |
|
PERIOD 3: Assessments
PRESENTATION | TEACHER’S ACTIVITY | PUPIL’S ACTIVITY |
STEP 1 ORAL ASSESSMENTS | The teacher asks questions symmetry | Pupils respond and participate |
STEP 2 DISCUSSION | The teacher discusses all the methods used by some learners in the oral assessments(some of the questions are solved on the board by the learners) and addresses any misconceptions that may have risen | Pupils pay attention and participate |
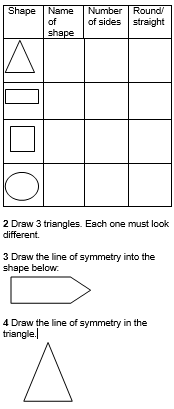
STEP 3 WRITTEN ASSESSMENTS | 1. Complete this table
| Pupils attempt their class work |
STEP 4 SUMMARY | The teacher marks the written assessments, corrects were necessary and commends the pupils |
|
PERIOD 4: Geometric patterns
PRESENTATION | TEACHER’S ACTIVITY | PUPIL’S ACTIVITY |
STEP 1 MENTAL MATHS | The teacher begins the lesson with some mental calculations Calculate 1 2 × 6 = 2 3 × 6 = 3 4 × 6 = 4 5 × 6 = 5 10 × 6 = 6 2 × 7 = 7 3 × 7 = 8 4 × 7 = 9 5 × 7 = 10 10 × 7 = | Pupils respond and participate |
STEP 2 CONCEPT DEVELOPMENT | The teacher In this activity, learners will create and describe patterns. • Gives each group a copy of the shape cut outs (2) so the\at they can cut out the shapes to use in this activity (each group will make 4 triangles, 4 squares, 4 rectangles and 4 circles). Learners take turns to place these shapes in repetitive patterns using 2 or more shapes in each pattern. e.g.
After the learner has created the pattern, they should describe it to the group. The description should be as clear as possible using the characteristics of the items to explain the progression. The whole group copies the pattern onto their whiteboards/scrap paper.
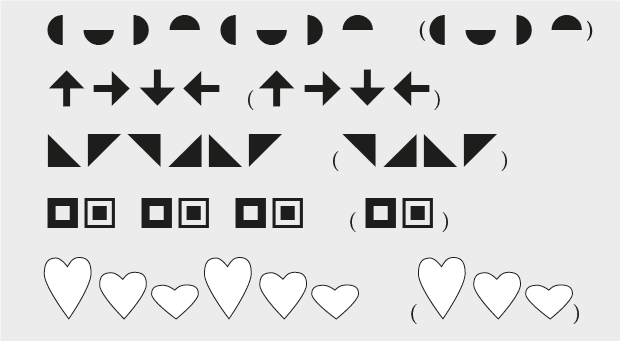
CLASS ACTIVITY The teacher In this activity learners will extend patterns • Draws the following pattern on the board: • Asks: What is the next shape in the pattern? (circle) How do you know? (Because the pattern goes circle, circle, triangle. After the first circle we need another one.) • Invites a learner to draw the shape in the correct place on the board. • Asks: What comes after the circle? (triangle) • Invite a learner to draw the shape in the correct place on the board. • Asks: Who can give us the next two shapes? (circle, circle) • Again invites a learner to draw the shape in the correct place on the board. • Now draws each of the following patterns on the board and, through questioning and interacting get the learners to complete the patterns by drawing at least three more items on the board. • Draw other patterns if you prefer and allow learners to draw patterns which they make up themselves.
| Pupils pay attention and participate |
STEP 3 CLASS-WORK |
| Pupils attempt their class work |
STEP 4 HOME-WORK | 1 Find 3 different objects (2 of each) in your kitchen, like glasses, plates and bowls. 2 Use your objects to make a pattern. 3 Draw and extend your pattern in your book. | Pupils attempt their class work |
STEP 5 SUMMARY | The teacher summarizes by reminding the pupils how to describe, create and extend geometric patterns.
She marks their class works, makes corrections where necessary and commends them positively |
|
PERIOD 5: Weekly Test/consolidations
TEACHER’S ACTIVITY: The teacher revises all the concepts treated from period 1-4 and gives the pupils follow through exercises, quiz and tests . She marks the exercises, makes corrections and commends the pupils positively.
PUPIL’S ACTIVITY: The pupils work on the worksheets and exercises given by the teacher individually
CONSOLIDATION
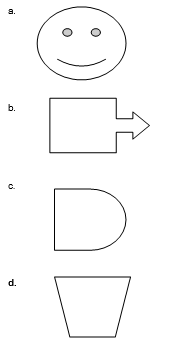
1 Draw in lines of symmetry in the following shapes:
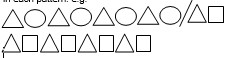
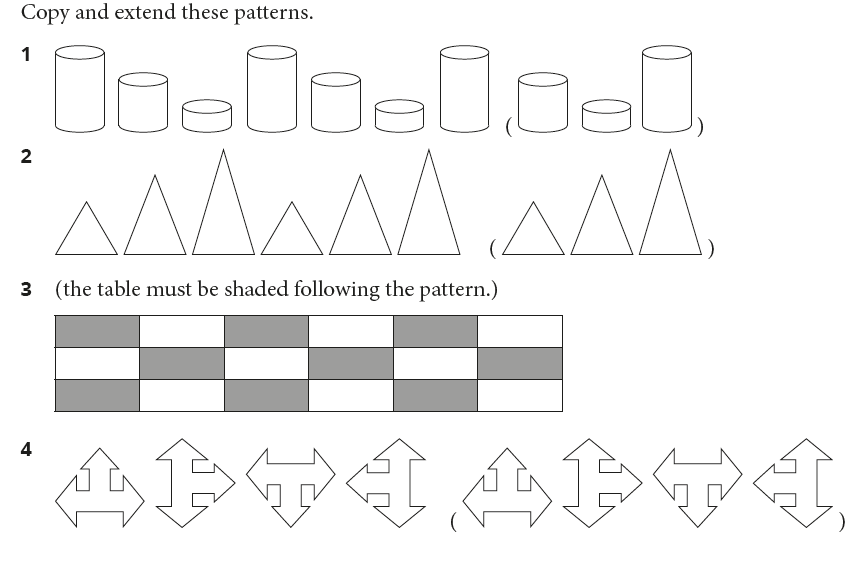
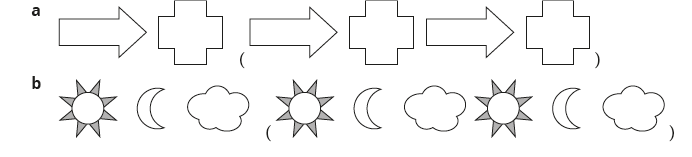
2 Copy and extend the following geometric patterns.
© Lesson Notes All Rights Reserved 2023