Lesson Notes By Weeks and Term - Primary 3
2-D Shapes
2-D Shapes
TERM: 2nd Term
WEEK: 6
CLASS: Primary 3
AGE: 8 years
DURATION: 5 periods of 40 minutes each
DATE:
SUBJECT: Mathematics
TOPIC: 2-D shapes
SPECIFIC OBJECTIVES: At the end of the lesson, the pupils should be able to
INSTRUCTIONAL TECHNIQUES: Explanation, question and answer, demonstration, practical, assessments
INSTRUCTIONAL MATERIALS: String and sticks. scrap paper, Shape cut outs (1) and shape names, scrap paper, coloured pencils, videos from source-
PERIOD 1: Rectangles
PRESENTATION | TEACHER’S ACTIVITY | PUPIL’S ACTIVITY |
STEP 1 MENTAL MATHS | The teacher begins the lesson with some mental calculations Calculate 1 4 × 2 = 2 3 × 2 = 3 5 × 2 = 4 6 × 2 = 5 7 × 2 = 6 1 × 20 = 7 5 × 4 = 8 6 × 3 = 9 10 × 2 = 10 5 × 3 = | Pupils respond and participate |
STEP 2 CONCEPT DEVELOPMENT | The teacher • Describes a rectangle by saying, I am thinking about a shape. It has 4 sides and 4 square corners. The opposite pairs of sides are the same length. What shape am I thinking about? (a rectangle)
• Ensures that you model the correct use of vocabulary.
CLASS ACTIVITY The teacher • Takes the learners outside to a place where the learners can draw in the sand. • Lets the learners get into groups of 5. What shape did we discuss in class? ( a rectangle) What are the features of a rectangle? (It has 4 sides, 4 square corners and the opposite pairs of sides are equal in length.) • Instructs the class: In your groups, find a stick. Each of you draw a different size rectangle in the sand. • Asks: Who drew the biggest rectangle? Who drew the smallest rectangle? • Gives each group a piece of string. Using the string make a rectangle. Encourage the learners to use the correct vocabulary. Which was easier to use to make a rectangle? A stick or string? Discuss this with your learners (no right answers here).
• Returns to the classroom.
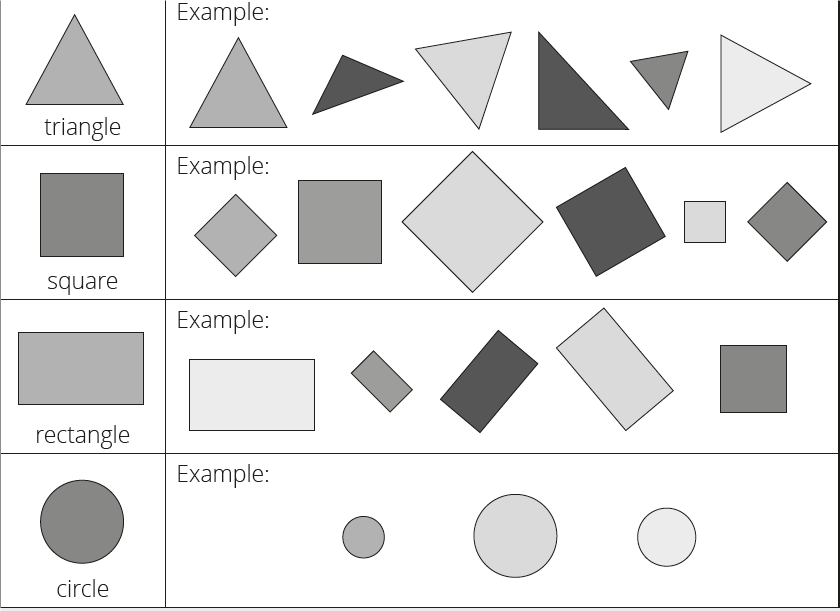
ACTIVITY II The teacher • Encourages learners to learn and use all of the shape names you have used in the last 4 lessons on shapes, circle, triangle, square and rectangle. Ask learners to look around the classroom. • Asks: Give the names of objects in the class that are rectangular in shape. (Window, desk, pencil case, eraser, book, carpet, etc.) • Discusses the difference between the outline of the shape (e.g. the outline of a window frame that looks rectangular) and the solid 3-D window frame itself. The window frame is not a rectangle but it has a rectangular shape. • Asks: Give the names of objects in the class that are circular, triangular and square in shape. (Examples will vary depending on what learners see in the class. Windows could be square/rectangular, the dustbin could have a circular opening, a bottle or can has a circular edge, triangles are more difficult to find – you might have a triangular box? etc.) • Asks: What do all these shapes have in common? (They are all 2-D shapes) | Pupils pay attention and participate |
STEP 3 CLASS-WORK | Draw the following: 1 A rectangle 5 cm wide and 7 cm long in the middle of your page. 2 Draw a triangle on the left of the rectangle. 3 Draw a 4 cm square on the right of the rectangle. 4 Draw circle below the rectangle. | Pupils attempt their class work |
STEP 4 HOME-WORK | Draw a picture of a person using rectangles, squares, circles and triangles. | Pupils attempt their class work |
STEP 5 SUMMARY | The teacher summarizes by reminding the pupils about the characteristics of a rectangle.
She marks their class works, makes corrections where necessary and commends them positively |
|
PERIOD 2 : Assessments
PRESENTATION | TEACHER’S ACTIVITY | PUPIL’S ACTIVITY |
STEP 1 ORAL ASSESSMENTS | The teacher asks questions on 2-D shapes | Pupils respond and participate |
STEP 2 DISCUSSION | The teacher discusses all the methods used by some learners in the oral assessments(some of the questions are solved on the board by the learners) and addresses any misconceptions that may have risen | Pupils pay attention and participate |
STEP 3 WRITTEN ASSESSMENTS | 1 Circle which of these shapes have round sides. Squares, circle, rectangle, triangle
2 Draw 3 different size triangles in 3 different positions. 3 Draw a square that has 5 cm sides. 4 Draw a rectangle that is 6 cm long and 4 cm wide. 5 A square, triangle, circle and rectangle are 2-D shapes. What does this mean? | Pupils attempt their class work |
STEP 4 SUMMARY | The teacher marks the written assessments, corrects were necessary and commends the pupils |
|
PERIOD 3: Sort and compare 2-D shapes
PRESENTATION | TEACHER’S ACTIVITY | PUPIL’S ACTIVITY | ||||||
STEP 1 MENTAL MATHS | The teacher begins the lesson with some mental calculations Calculate 1 1 × 1 = 2 4 × 5 = 3 5 × 2 = 4 3 × 1 = 5 7 × 3 = 6 3 × 4 = 7 2 × 1 = 8 8 × 0 = 9 9 × 10 = 10 6 × 5 = | Pupils respond and participate | ||||||
STEP 2 CONCEPT DEVELOPMENT | The teacher • Uses Prestik to stick cut-outs of the following shapes on the board: rectangle, triangle, circle, square. • Gets the learners to identify the labels that belong to the cut-outs of the shapes and place them below the correct shapes. • Points to one shape e.g. the rectangle, and ask the learners to each contribute one sentence towards describing the shape, e.g. It has 4 sides/All the sides are straight/There are 4 corners/All the corners are the same size, etc. • Does the same for the remaining shapes. • Tries to ensure that everyone gets a chance to say something using the correct vocabulary.
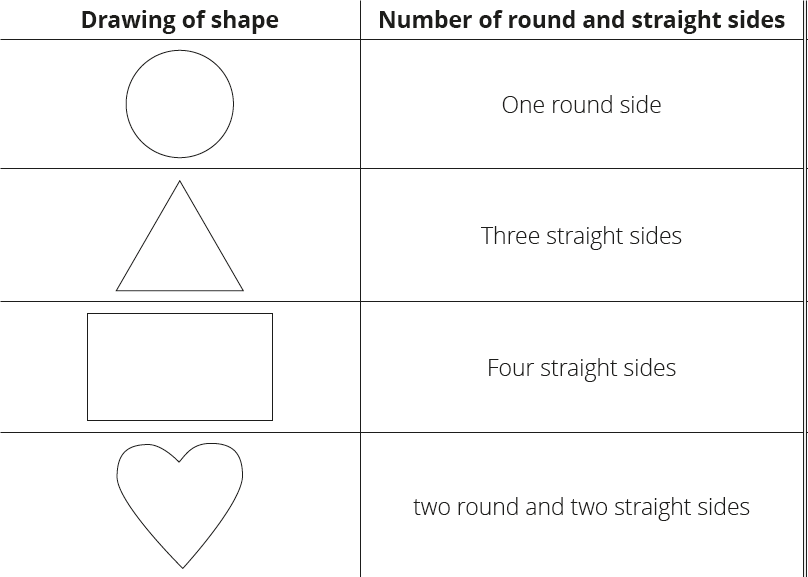
CLASS ACTIVITY The teacher • Gives each group a sheet of scrap paper to draw on. • Asks learners to draw as many shapes as they can think of with straight sides on the paper. Every learner in the group should get a chance to draw a shape. • Compares each group’s shapes to see if there are any other shapes that they didn’t think of and add those shapes to your group’s picture. • Gives each group a turn to call out one shape and a colour. The whole class now colours that shape (e.g. triangles – red). If a group does not have the shape, they draw it in. • Carries on until all the shapes are coloured in. ACTIVITY II • Revises by asking: If a shape does not have straight sides, what will it have? (round sides) • Draws the following shapes on the board, and ask learners to identify the number of straight and round sides on each one.
| Pupils pay attention and participate | ||||||
STEP 3 CLASS-WORK | 1 Say if the following shapes have round or straight sides: 2 Draw three shapes in each block below:
| Pupils attempt their class work | ||||||
STEP 4 HOME-WORK | Draw a picture of a house. Use circles, squares, rectangles and triangles. | Pupils attempt their class work | ||||||
STEP 5 SUMMARY | The tacher summarizes by reminding the pupils how to sort and compare 2-D shapes.
She marks their class works, makes corrections where necessary and commends them positively |
|
PERIOD 4: Consolidation of 2-D shapes
PRESENTATION | TEACHER’S ACTIVITY | PUPIL’S ACTIVITY |
STEP 1 MENTAL MATHS | The teacher begins the lesson with some mental calculations Calculate 1 __ × 10 = 50 2 __ × 10 = 30 3 __ × 2 = 12 4 __ × 2 = 20 5 __ × 10 = 60 6 __ × 10 = 90 7 __ × 2 = 18 8 __ × 2 = 14 9 __ × 10 = 70 10 __ × 2 = 0
| Pupils respond and participate |
STEP 2 CONCEPT DEVELOPMENT | The teacher • Revises curved and straight sides by asking learners to draw different 2-D shapes on the board. Each time, ask the learner to name the shape they drew and discuss is properties (straight/round sides, big/small). • Uses the shape name cards to label the drawings the learners do.
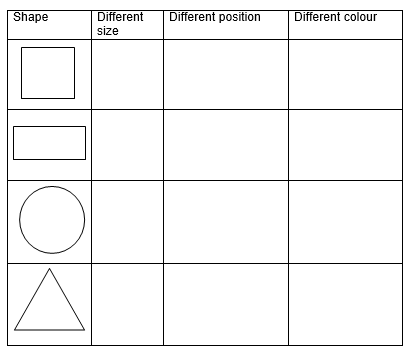
CLASS ACTIVITY The teacher * Sticks cardboard cut-out shapes (rectangles, squares and triangles) randomly on the board. • Asks: What can you tell me about the sides of all these shapes? (They are all straight.) • Asks: What shapes are they? (Triangles, rectangles, squares.) • Calls a learner to sort the shapes on the board. • Asks: How did you sort the shapes (We put all the rectangles together, all the triangles together and all the, squares together.) Rotates the triangles so that they all face different directions. • Asks: Are the shapes in the circle still triangles? (Yes.) • Asks: How do you know? (Triangles have three straight sides and three corners. If you rotate a shape it changes position but the shape itself does not change.) Do the same with the rectangles and squares.
ACTIVITY II The teacher - Draws the following on the board. Ask learners to come to the board and draw other shapes, e.g. triangles that look different from yours/are facing in a different direction. Ask them to explain what the difference is.
Note: The teacher helps learners to become familiar with the shape terminology by asking questions and allowing learners to use the words they have learnt. | Pupils pay attention and participate |
STEP 3 CLASS-WORK | Learners need to use old newspapers/magazines/advertisement flyers for question 7of the classwork activity. (Answers will vary) 1 Draw a triangle. Draw three more triangles, but in different positions. 2 Are the sides of the triangle round or straight? 3 Draw a rectangle. Draw three more rectangles, but in different positions. 4 Are the sides of the rectangle round or straight? 5 Draw three circles of different size. 6 Are the sides of the circle round or straight? 7 Find and cut out squares of different sizes from a magazine. Stick them in your book, all in different positions. a How many sides does each one have? b Are they straight or round? | Pupils attempt their class work |
STEP 4 HOME-WORK | Draw a picture of a tree. You may use shapes with straight sides and round sides. | Pupils attempt their class work |
STEP 5 SUMMARY | The teacher revises the properties of 2-D shapes.
She marks their class works, makes corrections where necessary and commends them positively |
|
PERIOD 5: Weekly Test/consolidations
TEACHER’S ACTIVITY: The teacher revises all the concepts treated from period 1-4 and gives the pupils follow through exercises, quiz and tests . She marks the exercises, makes corrections and commends the pupils positively.
PUPIL’S ACTIVITY: The pupils work on the worksheets and exercises given by the teacher individually
CONSOLIDATION
1 Complete the table:
© Lesson Notes All Rights Reserved 2023