Lesson Notes By Weeks and Term - Primary 2
2-D Shapes
2-D Shapes
TERM: 3rd Term
WEEK: 5
CLASS: Primary 2
AGE: 7 years
DURATION: 5 periods of 40 minutes each
DATE:
SUBJECT: Mathematics
TOPIC: 2 D-shapes
SPECIFIC OBJECTIVES: At the end of the lesson, the pupils should be able to
INSTRUCTIONAL TECHNIQUES: Explanation, question and answer, demonstration, practical
INSTRUCTIONAL MATERIALS: Large square and rectangle, shape cut-outs, scrap paper
PERIOD 1: Assessment
PRESENTATION | TEACHER’S ACTIVITY | PUPIL’S ACTIVITY |
STEP 1 ORAL ASSESSMENTS | The teacher asks questions on mental maths treated so far | Pupils respond and participate |
STEP 2 DISCUSSION | The teacher discusses all the methods used by some learners in the oral assessments(some of the questions are solved on the board by the learners) and addresses any misconceptions that may have risen | Pupils pay attention and participate |
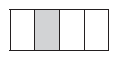
STEP 3 WRITTEN ASSESSMENTS | 1 What fraction of the rectangle is shaded?
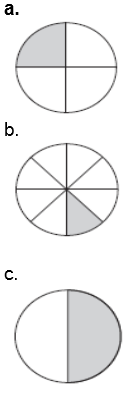
2 What fraction of the circle is shaded? Write your answer as a fraction number.
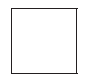
3 Divide the rectangle into quarters. 4 Divide the square in half. 5 Divide the rectangle into eighths.
| Pupils attempt their class work |
STEP 4 SUMMARY | The teacher marks the written assessments, corrects were necessary and commends the pupils |
|
PERIOD 2: 2-D shapes
PRESENTATION | TEACHER’S ACTIVITY | PUPIL’S ACTIVITY |
STEP 1 MENTAL MATHS | The teacher begins the lesson with some mental calculations • Ask the learners to start at 2 and count on in twos until they reach 20. | Pupils respond and participate |
STEP 2 CONCEPT DEVELOPMENT | The teacher • Pastes a large square and rectangle that you have made from flip chart paper on the board. • Holds up both shapes in the front of the class. • Says: This is a square and this is a rectangle. (Show the learners each shape.) • Asks: What are the similarities between these 2 shapes? (They both have 4 sides and 4 corners.) • Asks: What are the differences between these 2 shapes? (The length of the sides. Two sides of a rectangle are long, while the other two sides are shorter.) • Asks different learners to come to the board to draw squares and rectangles. • Discusses the properties of the shapes with the learners each time.
ACTIVITY II
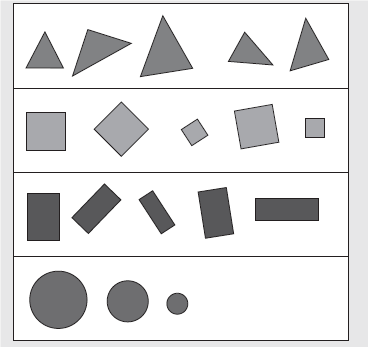
• Asks: Can you tell me what you notice about the shapes? Discusses ideas such as: Triangles that are shaped differently and placed in different positions.
Squares of different sizes, placed in different positions.
Rectangles of different shapes, placed in different positions.
Circles of different sizes. • Discusses the position and orientation of the shapes.
ACTIVITY II The teacher • Does this activity practically with the learners using the shape cut outs (or plastic shapes if you have them). • Gives the learners (in groups at their desks) a collection of plastic/cardboard shapes (shape cut outs) of different sizes. • Asks the learners to sort the shapes according to shape, size (and colour if you have made different colour copies). • Discusses the various ways in which the learners have sorted the shapes. Talk about the different groups that are formed when you sort according to different criteria. | Pupils pay attention and participate |
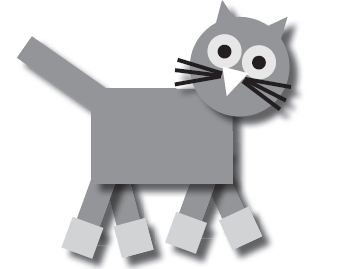
STEP 3 CLASS-WORK | 1 Draw a square in two different positions. 2 Draw a triangle in two different positions. 3 Draw a picture using different shapes. Count how many triangles, squares and rectangles were used in the picture. 4 Colour your picture using the colours red, blue, yellow and green. | Pupils attempt their class work |
STEP 4 HOME-WORK | 1 Count the shapes in the drawing:
a Triangles _______ . b Squares _______ . c Rectangles _______ . d Circles _______ .
2 If you change the position of a shape does the shape change?
| The pupils writes it in their homework book |
STEP 5 SUMMARY | The teacher summarizes by reminding the pupils that in this lesson we have learnt about 2-D shapes in different positions.
She marks their class works, makes corrections where necessary and commends them positively |
|
PERIOD 3: 2-D shapes
PRESENTATION | TEACHER’S ACTIVITY | PUPIL’S ACTIVITY |
STEP 1 MENTAL MATHS | The teacher begins the lesson with some mental calculations • Ask the learners to start at 3 and count on in threes until they reach 30. | Pupils respond and participate |
STEP 2 CONCEPT DEVELOPMENT | The teacher • Does this activity practically with the learners using the shape cut outs (or plastic shapes if you have them). • Gives the learners (in groups at their desks) a collection of plastic/cardboard shapes (shape cut outs) of different sizes. • Selects a triangle, circle, square and rectangle from the shape cut-outs. • Holds up your large shapes while you discuss the properties of each of the shapes with the learners The properties to discuss are the number of sides and corners.
CLASS ACTIVITY The teacher • Continues working with the shape cut-outs from the previous activity. • Asks the learners to pick up a triangle and a circle. • Asks: Can you trace the sides of a circle and a triangle with your fingers? (Show them how to do this if necessary.) • Asks: What is difference between a circle and a triangle? (The triangle has straight sides. The circle has round sides. The triangle has 3 sides. The circle has one round (curved) side.) • Asks: Can you trace the sides of a circle and a rectangle with your fingers? (Show them how to do this if necessary.) • Asks: What is difference between a circle and a rectangle? (The rectangle has straight sides. The circle has round sides. The rectangle has 4 sides. The circle has one round (curved) side.) • Asks: Can you trace the sides of a square and a rectangle with your fingers? (Show them how to do this if necessary.) • Asks: What is difference between a square and a rectangle? (The rectangle and the square both have straight sides. The rectangle and the square both have 4 sides. The sides of the square are all the same length. The rectangle has two long and two short sides.) • Asks: Can you trace the sides of a triangle and a rectangle with your fingers? (Show them how to do this if necessary.) • Asks: What is difference between a triangle and a rectangle? (The rectangle and the triangle both have straight sides. The rectangle has 4 sides. The triangle has 3 sides.) • Asks the learners to sort the shapes according to straight and round sides: Straight sides: triangles, squares and rectangles. Round sides: circles. • Asks the learners to sort the shapes according to the number of sides: Three sides: triangles. Four sides: squares and rectangles. One side: circles. | Pupils pay attention and participate |
STEP 3 CLASS-WORK | 1 Draw and name two shapes with straight sides.
2 Draw and name a shape with round sides.
3 Use all the shapes you know of with straight sides to draw your own picture.
4 Use all the shapes you know of with round sides to draw your own picture.
5 Choose one shape with straight sides and one shape with round sides to make your own pattern. | Pupils attempt their class work |
STEP 4 HOME-WORK | Design a car using the following shapes: 2 circles, 2 rectangles, 3 squares and 2 triangles.
| The pupils writes it in their homework book |
STEP 5 SUMMARY | The teacher summarizes by reminding the pupils that in today’s lesson we have learnt about 2-D shapes and their sides.
She marks their class works, makes corrections where necessary and commends them positively |
|
PERIOD 4: 2-D shapes
PRESENTATION | TEACHER’S ACTIVITY | PUPIL’S ACTIVITY |
STEP 1 MENTAL MATHS | The teacher begins the lesson with some mental calculations Ask the learners to start at 5 and count on in 5s until they reach 50. | Pupils respond and participate |
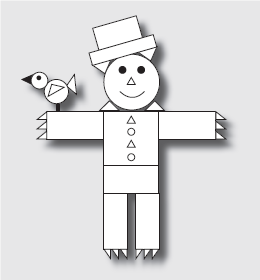
STEP 2 CONCEPT DEVELOPMENT | The teacher • Asks the learners to identify and name all the different shapes they can see. (Rectangles, triangles, circles.)
When identifying the shapes, they should use sentences such as: The hat is made from two rectangles, etc. • Learners could colour each type of shape a different colour at the end of the lesson if they finish the classwork activity early.
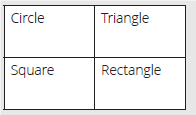
ACTIVITY II The teacher • Gives each learner a piece of scrap paper. Ask them to fold the scrap paper into four equal parts (quarters). • Says: Draw lines on the folds on your scrap paper. • Draws a grid on the board (like the scrap paper divide into quarters). • Writes the words circle, triangle, rectangle and square in the grid on the board. • Says: Copy the words and draw one of each shape on your scrap paper. (Learners draw one of each shape in the correct blocks.)
• Says: Now draw a similar, but smaller, shape next to each of the shapes. • Says: Colour in the shape with round sides. (Learners colour the circles.) • Asks: What is the difference between a circle and a triangle? (A circle has round sides and a triangle has straight sides.) How are triangles and rectangles the same? (Both these shapes have straight sides.) What is the difference between a triangle and a rectangle? (A triangle has 3 sides and a rectangle has 4 sides.) | Pupils pay attention and participate |
STEP 3 CLASS-WORK | NOTE: The word grid activity in this lesson is in English. Teachers can adapt this and make a grid to include shape names in other languages if they wish to. Learners do need to know the shape names in English and so this lesson gives them the opportunity to learn them.
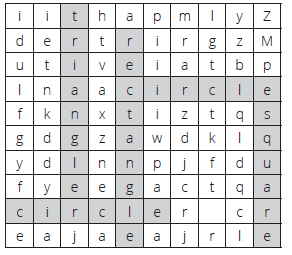
Find the following words in the word search and colour each word in a different colour: circle, triangle, square, rectangle.
1 Draw and label the shapes that you have identified in the word search.
2 What is the difference between a square and a triangle?
3 What is the difference between a circle and a square?
4 Draw three squares of different size, from smallest to biggest.
5 Draw three circles of different size, from smallest to biggest. | Pupils attempt their class work |
STEP 4 HOME-WORK | 1 Draw three triangles of different size, from smallest to biggest.
2 Draw three rectangles of different size, from smallest to biggest. | The pupils writes it in their homework book |
STEP 5 SUMMARY | The teacher summarizes by reminding the pupils that in today’s lesson we have learnt more about 2D shapes.
She marks their class works, makes corrections where necessary and commends them positively |
|
PERIOD 5: Weekly Test/consolidations
TEACHER’S ACTIVITY: The teacher revises all the concepts treated from period 1-4 and gives the pupils follow through exercises, quiz and tests. She marks the exercises, makes corrections and commends the pupils positively.
PUPIL’S ACTIVITY: The pupils work on the worksheets and exercises given by the teacher individually
CONSOLIDATION
1 Colour the squares red, the triangles green, the circles blue and the rectangles yellow.
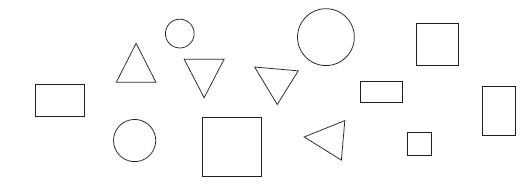
2 How many triangles are there?
3 How many circles are there?
4 How many rectangles are there?
5 How many squares are there?
6 Write on each shape whether the sides are round or straight.
© Lesson Notes All Rights Reserved 2023