Lesson Notes By Weeks and Term - Primary 2
Ball and box shapes
Ball and box shapes
TERM: 3rd Term
WEEK: 10
CLASS: Primary 2
AGE: 7 years
DURATION: 5 periods of 40 minutes each
DATE:
SUBJECT: Mathematics
TOPIC: Ball and box shapes
SPECIFIC OBJECTIVES: At the end of the lesson, the pupils should be able to
INSTRUCTIONAL TECHNIQUES: Explanation, question and answer, demonstration, practical
INSTRUCTIONAL MATERIALS: A range of balls, books, boxes, marbles (all different sizes & colours), pictures of boxes, balls and bricks from old magazines/advertisements for cutting out pictures (collect), A range of cardboard boxes, building blocks, books, empty matchboxes
(collect beforehand, asking learners to bring too), Ball-shaped objects, box-shaped objects, cylinder-shaped objects that you have collected, 3-D objects, toilet roll inners.
PERIOD 1: Ball and box shapes
PRESENTATION | TEACHER’S ACTIVITY | PUPIL’S ACTIVITY |
STEP 1 MENTAL MATHS | The teacher begins the lesson with some mental calculations Write the numbers from smallest to biggest 1 8, 5, 9 2 14, 11, 15 3 21, 19, 23 4 40, 14, 41 5 24, 42, 41 6 39, 9, 29 7 34, 43, 33 8 29, 11, 37 9 50, 38, 47 10 24, 31, 9 | Pupils respond and participate |
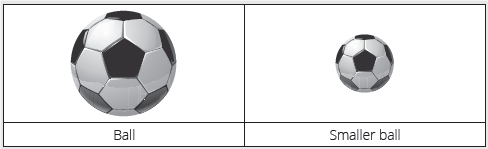
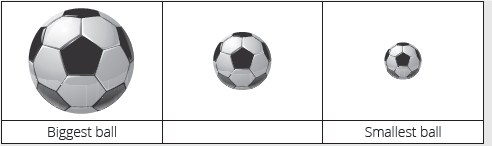
STEP 2 CONCEPT DEVELOPMENT | The teacher • Displays the 3-D objects that you have collected in front of the class. If you did not collect shapes, show learners pictures of shapes. However, it is MUCH better if you can show them real examples of shapes. • Compares and describes 3-D objects; learners compare the sizes of similar objects. • Asks the learners to order two different balls according to size. For example: The ball on the left/right is bigger than the ball on the right/left.
• They should use the language of size to compare objects, namely: big, bigger, biggest, small, smaller and smallest.
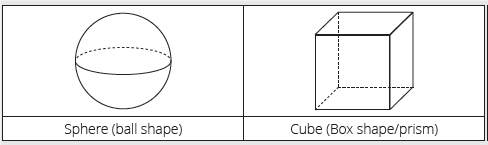
• Reinforces this language by using other objects that can be compared, e.g. books of different sizes and pencils of different lengths. • Asks the learners to compare the colours of similar objects and then sort the coloured balls/boxes. They should practise identifying and naming both the objects and their colours, as well as comparing sizes of objects, e.g. the red ball is bigger than the blue ball. Learners name the balls as spheres and the boxes as cubes/prisms.
A ball is called a sphere in mathematics. A box can be called a cube/prism in mathematics. • Discusses the properties of a sphere and a cube/prism. • Compares the edges. (The cube has straight edges and the sphere has round edges) • Considers if they will roll or slide. (The cube can slide and the ball can roll. The cube cannot roll and the sphere does not slide.) ACTIVITY II The teacher • Puts your collection of different sized 3-D objects into a plastic or material bag. This bag is your Mystery Bag. • Chooses a learner to come to the front of the class. The learner picks an object out of the bag without looking. The learner the looks at the object and describes the object to the class in terms of size, colour, types of surfaces and whether it rolls or slides. • Allows as many learners as possible to participate in the game. Return the shapes to the bag once they have all been taken out of the bag if you want to reuse them in order to play the game for longer. | Pupils pay attention and participate |
STEP 3 CLASS-WORK | 1 Draw a picture of a box shape and a ball shape.
2 Give the names of two 3-D objects you can see in the classroom
3 Do they have round or straight edges?
4 Say if the following will roll or slide: a a ball b a box | Pupils attempt their class work |
STEP 4 HOME-WORK | NOTE: Learners’ answers will vary. Check that they have answered the questions correctly and discuss as needed. 1 Find 3 different objects in your kitchen at home that are ball shaped. 2 Put the objects in order from the smallest object to the biggest object and then draw them. 3 Find 3 different box shaped objects in your bedroom/any room at home. 4 Put the objects in order from the biggest object to the smallest object and draw them. | The pupils writes it in their homework book |
STEP 5 SUMMARY | The teacher summarizes by reminding the pupils that in this lesson we have learnt about ball and box shapes.
She marks their class works, makes corrections where necessary and commends them positively |
|
PERIOD 2: Building with 3-D objects
PRESENTATION | TEACHER’S ACTIVITY | PUPIL’S ACTIVITY |
STEP 1 MENTAL MATHS | The teacher begins the lesson with some mental calculations Which number is bigger? 1 244 or 188 2 128 or 282 3 213 or 243 4 363 or 336 5 320 or 230 6 278 or 287 7 398 or 389 8 337 or 373 9 230 or 233 10 307 or 377 | Pupils respond and participate |
STEP 2 CONCEPT DEVELOPMENT | The teacher • Gives each group a book, a ball and a number of matchboxes. • Asks the learners to make a slide or incline by placing some matchboxes under one end of a large book. Learners can now experiment to see whether objects will slide or roll down the incline. • The ball rolls down and the box slides down.
CLASS ACTIVITY The teacher • Gives each group some boxes and some ball shapes. Learners should experiment to see whether you can make towers by using only balls and boxes or a mixture of the two kinds of shapes. • Asks learners: Can you build a tower using balls and boxes? • Asks learners to predict if it is possible – and how. Discuss and note the learners’ predictions. The learners should then try it out. After they have spent some time experimenting, ask the following questions: • Asks: Can you build a tower using balls? (no) • Asks: Can you build a tower using balls and boxes? (no) • Asks: Can you build a tower using boxes? (yes) • Discusses if their predictions were correct. If not, why not? Discuss. | Pupils pay attention and participate |
STEP 3 CLASS-WORK | 1 Can you build a tower with 4 different sized boxes and 2 different sized balls?
2 Can you build a tower just with balls? Why or why not?
3 Can you build a tower with just boxes? Why or why not?
4 Draw a tower made of 4 boxes.
5 Draw your own picture using balls and boxes | Pupils attempt their class work |
STEP 4 HOME-WORK | NOTE: Learners’ answers will vary. Check that they have answered the questions correctly and discuss as needed. 1 Name 3 ball shaped objects in your house. 2 Name 3 box shaped objects in your house. | The pupils writes it in their homework book |
STEP 5 SUMMARY | The teacher summarizes by reminding the pupils that in today’s lesson we learnt about building structures using ball and box objects.
She marks their class works, makes corrections where necessary and commends them positively |
|
PERIOD 3: Cylinders
PRESENTATION | TEACHER’S ACTIVITY | PUPIL’S ACTIVITY |
STEP 1 MENTAL MATHS | The teacher begins the lesson with some mental calculations Write down the following numbers in order from the biggest number to the smallest number: 1 8, 5, 9 2 14, 11, 15 3 21, 19, 23 4 12, 14, 10 5 67, 50, 82 6 134, 136, 135 7 156, 158, 157 8 134, 143, 123 9 179, 199, 189 10 129, 130, 131 | Pupils respond and participate |
STEP 2 CONCEPT DEVELOPMENT | The teacher • Gives the learners different kinds of 3-D objects randomly at their desks, e.g.
• Gives the learners the opportunity to discuss and touch these objects. • Asks them to sort these objects into three different groups: balls and ball-like objects; boxes and box-like objects; cylinders and cylinder-like objects. You will need to explain each 3-D shape. The ball-like objects are round – they are called spheres. The box-like shapes have flat surfaces – they are called prisms. The cylinder shapes have two flat circular surfaces and one curved surface. • Points to each object and ask the learners to name it. (This is a box/ball/cylinder.)
ACTIVITY II The teacher • Asks the learners if they can remember what roll and slide mean? • Asks them: Will a ball roll or slide? (Roll.) Will a box roll or slide? (Slide.) What do you think will happen with a cylinder? (When on its side it will roll, when standing upright it will slide.) • Shows the learners how a cylinder can roll and how it can slide:
It will roll on the curved side. It will slide on the flat side. • Discusses what shapes will roll/slide and why. • Discusses how the type of surface determines whether the shape can roll or slide: Curved surface – rolls. Flat surface – slides.
| Pupils pay attention and participate |
STEP 3 CLASS-WORK | 1 Name these objects:
2. Do these shapes roll or slide?
| Pupils attempt their class work |
STEP 4 HOME-WORK | 1 Find and cut out or draw pictures cylinders and cylinder-like objects. 2 Sort and stick the objects you found from smallest to biggest | The pupils writes it in their homework book |
STEP 5 SUMMARY | The teacher summarizes by reminding the pupils that in today’s lesson we have learnt to about cylinders, spheres and prisms. She marks their class works, makes corrections where necessary and commends them positively |
|
PERIOD 4 and 5: Weekly Test/consolidations
TEACHER’S ACTIVITY: The teacher revises all the concepts treated from period 1-4 and gives the pupils follow through exercises, quiz and tests. She marks the exercises, makes corrections and commends the pupils positively.
PUPIL’S ACTIVITY: The pupils work on the worksheets and exercises given by the teacher individually
CONSOLIDATION
NOTE: In question 3 of the classwork learners should draw their own pictures of a house
using 3-D shapes.
1 Name these shapes – sphere, prism or cylinder:

2 Paste or draw pictures of objects in the correct column:

3 Draw a house using prisms, spheres and cylinders.
© Lesson Notes All Rights Reserved 2023